
Jupyter Session#
Jupyter Notebooks are an excellent resource for interactive development and data analysis using Python, R, and other languages. Jupyter notebooks can contain live code, equations, visualizations, and explanatory text, which provide an integrated environment to use, learn, and teach interactive data analysis. Users can obtain quick access to Jupyter Notebooks using a Jupyter Session on Open OnDemand. We provide users access to both the classic Jupyter Notebook graphical user interface (GUI) as well as a JupyterLab GUI. JupyterLab is a fantastic tool that provides a highly customizable GUI, which allows users to easily navigate multiple Jupyter Notebooks, the CURC filesystem, and install extensions.
Launching a Jupyter Session#
Navigate to either the Interactive Apps or My Interactive Sessions tab and select Jupyter Session.
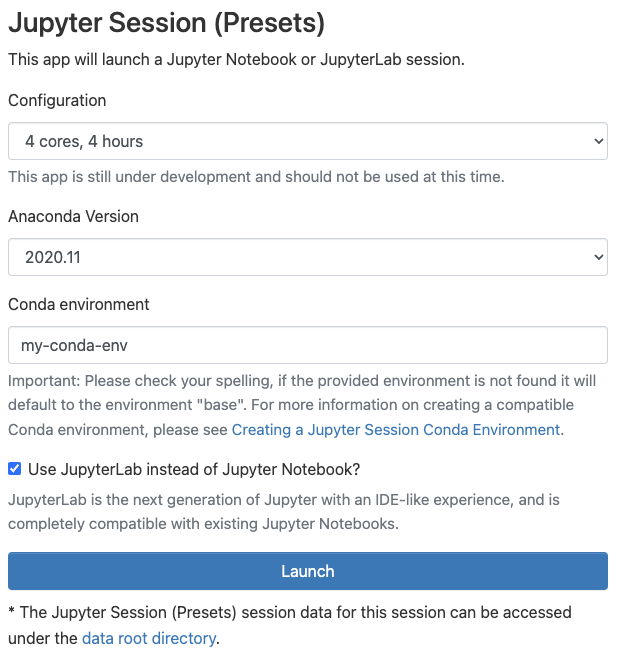
Select the Anaconda version, Conda environment, and type of GUI you would like to launch the application with. The Conda environment configuration can be particularly useful, if you need to utilize Jupyter extensions. For more information on creating a compatible Conda environment for Jupyter sessions, please see the section Creating a Jupyter Session Conda Environment below.

Specify a “Configuration type” and select the resources you would like to use. For more information on this functionality see Configuring Open OnDemand interactive applications.
When your Jupyter session is ready, you can click the “Connect to Jupyter” button to bring up a web page with the Jupyter interface. When there is high usage on the system, it may take several minutes to open a Jupyter Session.

After connecting to the Jupyter session, you should then be able to utilize Jupyter as if it were on your own computer!
Important
The first time the session starts, you are placed in CURC root. This allows you to access all of your directories. However, you will not be able to create a notebook in this directory. You should navigate to one of your CURC spaces. In the JupyterLab GUI this is done by going to “File” in the upper left-hand corner, selecting “Open from Path…”, and entering the path you want to navigate to (e.g.
/projects/<your username>).

Sometimes it can be useful to create a custom Jupyter kernel, which allows you to switch between different environments without having to use the “Conda environment” field in the configuration. We provide detailed instructions on how to do this in the Creating your own custom Jupyter kernel section below.
Closing the window will not terminate the job, you can use the “My Interactive Sessions” tab to view all open interactive sessions and terminate them.
Creating a Jupyter Session Conda Environment#
In Jupyter Session applications you have the option to launch a Jupyter session using a Conda environment that you have created. This becomes extremely useful if you are using a package that requires extensions be installed in the environment that is launching the Jupyter session. In order to configure your environment so that it launches correctly, you need to ensure that the appropriate packages are installed in it. Below we provide the process needed to correctly create your environment using a JupyterLab terminal.
Launch a Jupyter session by selecting the Anaconda version of your choice, specifying the
baseConda environment, and checking the use JupyterLab checkbox.Once the Jupyter session has been launched, open up a terminal in JupyterLab.
In your terminal, load the Anaconda version you wish to use e.g.
[user@c3cpu-a2-u3-4 ~]$ module load anaconda/2020.11
Follow our documentation: steps on configuring your Conda settings via ~.condarc.
Create a Conda environment with the name and Python version of your choice (here we use
my-conda-envand Python version 3.10)[user@c3cpu-a2-u3-4 ~]$ conda create -n my-conda-env python=3.10
Activate your conda environment
[user@c3cpu-a2-u3-4 ~]$ conda activate my-conda-env
Install either JupyterLab or Jupyter Notebook (it is preferred that users install JupyterLab)
If you would like to install JupyterLab:
(my-conda-env) [user@c3cpu-a2-u3-4 ~]$ conda install -c conda-forge jupyterlab
Important
If you are experiencing issues with JupyterLab functionality e.g. trouble deleting notebooks from within the GUI, inconsistent behavior in the terminal within the GUI, etc., we have traced these issues down to incompatibilities with JupyterLab versions. In this scenario, we recommend rebuilding the environment and installing version 3.4.0 of JupyterLab:
conda install -c conda-forge jupyterlab=3.4.0
If you would like to install Jupyter Notebook (the classic version of Jupyter)
(my-conda-env) [user@c3cpu-a2-u3-4 ~]$ conda install -c conda-forge notebook
You can now install the rest of the packages you require in this environment.
Launching a Jupyter Session using my-conda-env Conda environment#
Specify
my-conda-envin “Conda environment” field.
Once the session is launched, it is also important to ensure that your environment is being correctly utilized. To do this, open up a terminal application and determine what Python and Jupyter are being used:
[user@c3cpu-a2-u3-4 ~]$ which python
/projects/<username>/software/anaconda/envs/my-conda-env/bin/python
[user@c3cpu-a2-u3-4 ~]$ which jupyter
/projects/<username>/software/anaconda/envs/my-conda-env/bin/jupyter
The provided output should be utilizing the environment you created, as seen by the output
anaconda/envs/my-conda-env.If your environment is not being used, this is usually due to one of two reasons:
You have incorrectly provided the name of your Conda environment
You have chosen an Anaconda version that is not the same as the one you used to install your Conda environment
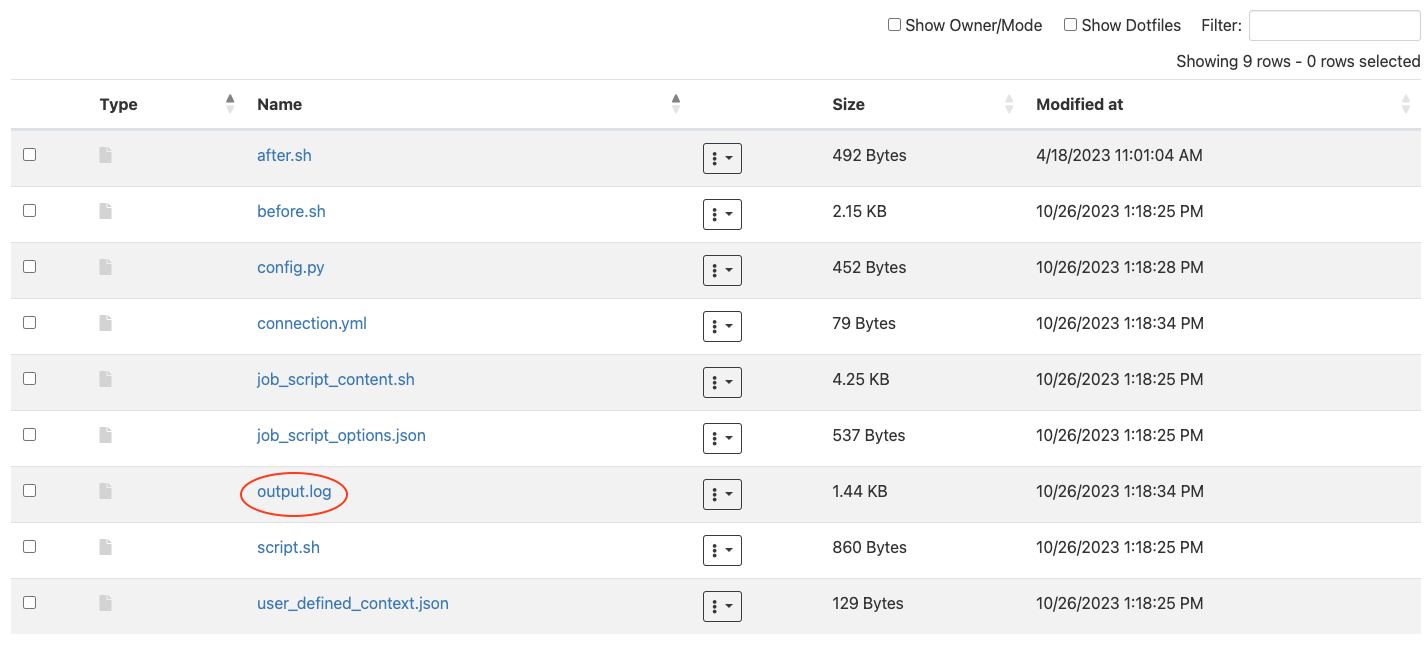
In both of these scenarios, you can confirm that your environment is not being used by looking at the output.log for your job:
Select “My Interactive Sessions” in the Open OnDemand interface.
Click the link next to the “Session ID” for your running job

Open the file
output.logby clicking it
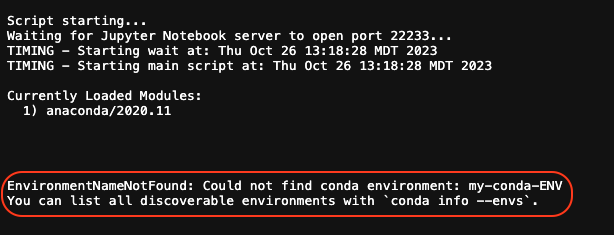
If you see an
EnvironmentNameNotFoundthis means that your environment is NOT being used
Creating your own custom Jupyter kernel#
Anaconda is an open-source software that provides access to Python and R distributions, and it includes the Conda package manager to easily install software and packages. Software and associated Jupyter kernels other than Python and R can also be installed using Conda. The following steps describe how to create your own custom Anaconda environments and associated Jupyter kernels for use within a Jupyter Session.
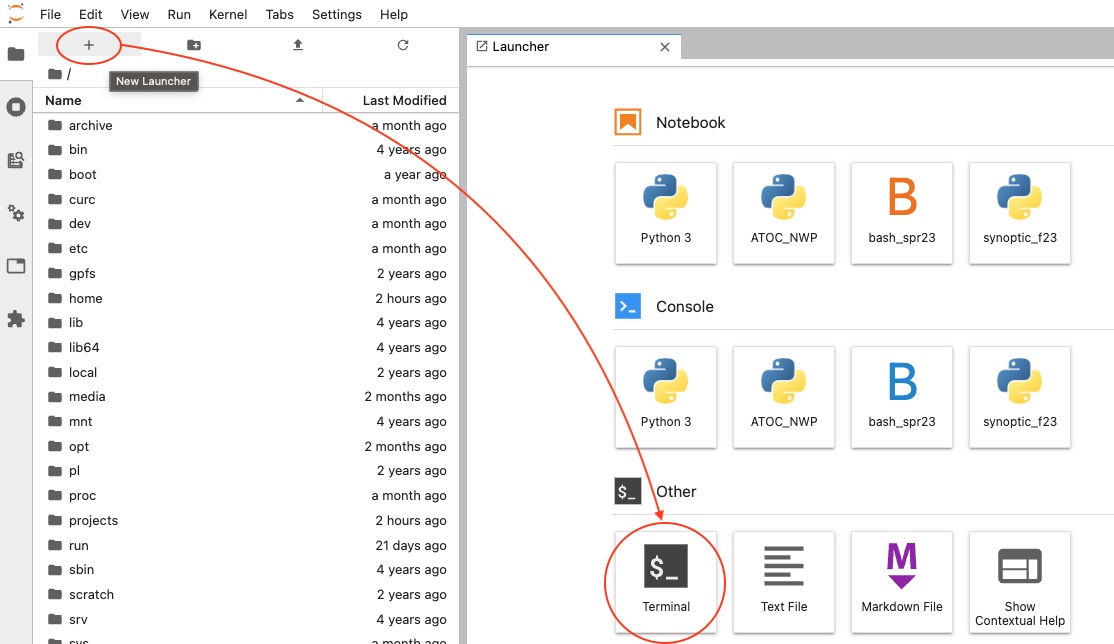
Follow these steps from a terminal session. You can get a new terminal session directly from Jupyter using New-> Terminal.
Configure your Conda settings by following our documentation: steps on configuring your Conda settings via ~.condarc.
Activate the CURC Anaconda environment
[johndoe@c3cpu-a5-u15-4 ~]$ module load anaconda
You will know that you have properly activated the environment because you should see (base) in front of your prompt. For example,
(base) [johndoe@c3cpu-a5-u15-4 ~]$
Create a new custom environment
Follow our documentation: steps on creating your own custom Conda environment and Creating a Jupyter Session Conda Environment.
Activate your new environment
(base) [johndoe@c3cpu-a5-u15-4 ~]$ conda activate mycustomenv
Note
We assume here that you’ve named your environment mycustomenv; please replace mycustomenv with whatever name you gave your environment!
Create your own custom kernel, which will enable you to use this environment in your Jupyter Session
For a python kernel
(mycustomenv) [johndoe@c3cpu-a5-u15-4 ~]$ conda install -y ipykernel
(mycustomenv) [johndoe@c3cpu-a5-u15-4 ~]$ python -m ipykernel install --user --name mycustomenv --display-name mycustomenv
The first command will install the ipykernel package if not installed already.
The second command will create a python kernel with the name mycustomenv with the Jupyter display name mycustomenv (note: the name and display-name are not required to match the environment name – call them anything you want). By specifying the
--userflag, the kernel will be installed in/home/$USER/.local/share/jupyter/kernels(a directory that is in the default JUPYTER_PATH) and will ensure your new kernel is available to you the next time you launch a Jupyter Session.
For an R kernel
(mycustomenv) [johndoe@c3cpu-a5-u15-4 ~]$ conda install -y r-irkernel
(mycustomenv) [johndoe@c3cpu-a5-u15-4 ~]$ R
> IRkernel::installspec(name = 'mycustomenv', displayname = 'mycustomenv')
The first command will install the irkernel package if not installed already.
The second command will start R. The third command, executed from within R, will create an R kernel with the name mycustomenv with the Jupyter display name mycustomenv (note: that the name and display-name are not required to match the environment name – call them anything you want). The kernel will be installed in
/home/$USER/.local/share/jupyter/kernels(a directory that is in the default JUPYTER_PATH) and will ensure your new kernel is available to you the next time you launch a Jupyter Session.
Note
If you have already installed your own version of Anaconda or Miniconda, it is possible to create Jupyter kernels for your preexisting environments by following Step 5 above from within the active environment.
If you need to use custom kernels that are in a location other than
/home/$USER/.local/share/jupyter(for example, if your research team has a group installation of Anaconda environments located in/pl/active/<some_env>), you can create a file in your home directory named~/.jupyterrccontaining the following line:
export JUPYTER_PATH=/pl/active/<some_env>/share/jupyter
If you need assistance creating or installing environments or Jupyter kernels, please submit a support request form.
Troubleshooting#
If you are a CSU or ACCESS user and are having trouble with packages that employ PERL (due to the
@symbol), visit our documentation on setting up a user variable that links to alternate paths without the@symbol in CSU and XSEDE/ACCESS usernames